Sunday 28 April 2013

I Challenge You to….


                             ….Think Differently About Your Face


One of the things you realise very early on as a makeup artist is the normal woman’s obsession with her perceived flaws.

I use the words “normal” and “perceived” very specifically here. The definition of a normal women being one who is neither a model nor a celebrity. Who with the influence of mass media, clever lighting and Photoshop believe that they suffer from imperfections (spots, lines, dark circles, bad bone structure….) that women in the spotlight have been granted immunity from?


Our common sense deep down is telling us that this must be nonsense, however we still cant help but wonder. Yes celebrities have the best in skincare, make-up artists and even cosmetic surgery. However the real difference is we are looking for, and at their “beauty”.

Meanwhile looking in the mirror at ourselves, our minds over exaggerate the areas we dislike. From the condition of our skin to the structure of our faces, we fixate on and curse the things we dislike. We are looking at our own “faults”.

So what’s the challenge? Well the issue is that when we focus so much on our faults and flaws this naturally dictates how we apply makeup. Therefore to improve how we apply our makeup we need to change how we think.

Bad skin?? - This encourages thick layers of heavy coverage foundation.
Dark Circles?? - Heavy layers of concealer under the eye area.
Pale skin?? - Over zealous bronzing all over the face??  


The trend here, we are trying to hide, to cover and to disguise. By doing so we create a flat, one colour and mask like appearance to our faces. Where too much heavy coverage makes the skin look dull and product sinks into fine lines. At the end we have neither brought forward nor pushed back aspects of our features. Only the same face remains, just like before except with a thickly covered, duller layer of skin.

So we need to think positive…to start with the things we can enhance, then at the end maybe cover up the odd spot or dark circle, if we can still see it that is? The theory being that if we draw attention to the beauty in our face and skin the other things appear less obvious.

Below I have added some tips to how you can enhance your natural beauty and some products that will help you with this. But the main idea here is that to be your own makeup artist ….you have to think like they do.

Enhance beauty. Create beauty. Celebrate beauty.


Tips

Even out natural skin tone with foundation. A light covering built up gradually on the cheeks, chin, nose and forehead is all that is needed. To bring out the youthful glow in the skin use an illuminating foundation or mix in an illuminating primer.


Illuminate the high points of the face with highlighter, tops of cheekbones, down the centre of the nose, very slightly under the brow and on the cupids bow. This lifts the features and gives a youthful glow.


Enhance the structure of the face with contour and matt bronzer. A little under the cheekbones, on the forehead and jawline adds depth to the face contrasting with the highlighter pulling features out.


Blush adds colour and brightens the face giving it a healthy glow. Keep this high on the cheeks merging into the highlighter. Avoid bringing this too far into the face (no further in than the width of the pupils). Blush which sits higher on the cheek also helps to counteract and detract from dark circles.


A small amount of powder through the arch of the brow will define at the most flattering point and lift the features. Avoid harshly drawn on brows and sharp edges. Let the natural brow show through rather than covering with thick amounts of product.


Running a thin amount of pencil liner through the lashes will give the effect of thicker lashes.


Wipe most of the product off the mascara brush before using to avoid over made up and clumpy lashes.


Use a small amount of illuminating concealer just on the precise part you can see any dark circles. For puffy under eyes a matt eye shadow blended under the eye will push this backwards.


Use a firmer yellow undertone concealer for spots, warm up on back of hand and pat onto spots or very gently buff on with fluffy brush. Build up coverage and avoid too much product getting onto areas with no spots.


Even out lip shape with a lip liner very gently tracing the lip line, avoid harshly or overdrawn lip lines as this can be ageing


Give ‘Em Some Lip


The weather has finally begun to turn warmer and its time for us to start thinking of our Spring/Summer makeup looks.

One thing that has been prominent on the Spring/Summer runways over the last couple of seasons is a bright lip and there are many to choose from now on the high street.


The beauty of a bright lip is that the rest of the makeup can be kept really fresh and minimal allowing the lip to be the main focus and steal the show. This means our summer looks can be quick and easy.

I usually keep the skin fresh, with a hint of bronzer or blush to warm up the cheeks. Add a sweep of a neutral shadow on the eye and a very thin liner pressed into the lash.

When applying lipstick, I recommend using a lip brush to get a precise edge. MAC has a great retractable one that can then be popped into your bag for touch ups later.


If you have thin lips, or you need to even them out or add definition a lip liner is your best friend. Either match this exactly to the lipstick or use a neutral colour like “Stone” by MAC to contour the lips to create depth at the edges.

Apply the lipstick all over the lip, using a firm sweeping motion when drawing the outer edge to get a straight edge.

Then to define or to touch up use a concealer brush, or an angled eyebrow brush to run foundation/concealer along the edge to neaten and sharpen the line

Another tip is to ensure the outer edges of the lower lip angle upwards, this is much more flattering and is more youthful as it lifts the features. This is something you will see used on most photo shoots and advertising campaigns.


As for the rest of the shape it is up to you whether you prefer a rounded or sharp lip. However the shape should be flattering with your features and compliment the style of your overall makeup look.

Now you know how to apply….you will want to know what to buy. Below is a selection of my favourite tried and tested lipsticks for that bright summer pop of colour.


Lime Crime – Suedeberry

Lime Crime has taken the lipstick world by storm with their new Velvetines Lipsticks. The product comes in a lip-gloss like tube and appears to have the consistency of a stain. However this product dries matte on to the lips with a very pigmented colour.  Despite being matte the Velvetines keep the lips moisturised, which is a great advantage over most other matte colours. The real selling point however is the staying point of this product; it remains intact for hours even through eating and drinking.

Unfortunately at the moment it is only available in 2 colours with Suedberry being my pick for a bright summery red.

Get it whist you can, as these sought after lip colours sell out constantly with demand so high!


MAC - Candy Yum Yum

For a perfect pink MAC have recently relaunched a previous limited edition colour to now be part of their permanent collection.

Candy Yum Yum not only has a great name but also a great finish. The colour is very bright and is at the bluey end of the pink spectrum.  This is great on warmer and olive skin tones as the coolness of the blue really pops. Best to keep the rest of the skin very minimal and using warm colours as this can easily look harsh and wash out the skin.


Sleek – Candy Cane

For those who find a blue pink too harsh for their complexion a coral pink is a great option.
Just like the rest of the Sleek range Candy Cane is a great quality lipstick at a really affordable price.  
The finish is sheen rather than matte but the strong pigment gives this the same depth of colour you would get with a matte finish.


MAC – Morange

The best bright orange on the market in my opinion. Morange is almost neon and not for the faint hearted. However if your skin suits orange-based lipstick this is definitely a show-stopping colour. This looks amazing on darker, olive or tanned skin. However this is probably not one to wear with fake tan as the orangey tones in the tan may make the combination a little too overpowering!


Tuesday 19 February 2013

Kebelo...100 Days of Amazing Hair!


I don’t usually write about hair products as it’s not my specialty however after trying this process out and seeing the results I had to share my experience.

I am unlucky to be the owner of very frizzy hair!! This is something which has caused me no end of stress, bad hair days and many, many hair products over the years.
Only very expensive frizz free shampoos, conditioners, serum followed by a lengthy blow dry and finally a fair effort with some straighteners was enough to calm it…and plenty of time to do all this.

However even this didn't guarantee my hair stayed smooth, humid or damp weather was a particular enemy of mine with the effects resembling something similar to Monica from “Friends”.


Queue the solution from my friend and trusted hairdresser Lee at Renegade Hair Studio, Leeds. He had been telling me about a process commonly known as a “ Brazilian Blow Dry” for quite a while. A treatment which smooths each strand of hair leaving it frizz free and lasts 100 days. I obviously immediately wanted a chance to try it, however Lee (ever the perfectionist) insisted he wasn't yet quite happy with the product or the process. Mainly the fact the treatment had to remain on the hair for a week before it could be washed.

So a couple of weeks ago I was excited to receive the news he had a product he was finally happy with and when did I want it doing…”NOW!!!!”

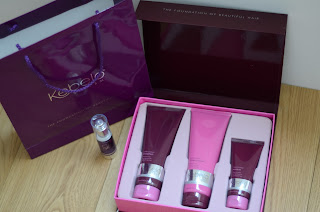
The product Lee had given the go ahead to is the “Kebelo System”. This contains none of the harsh chemicals of its predecessors and also can be washed off after only an hour of application.

The whole process from arriving to leaving the salon takes a bit longer than that and a very patient hairdresser. The hair is first washed with the Kebelo Cleansing shampoo to prep for the treatment.  The Kebelo Advantage is then applied section by section until covering all the hair.  The hair is now blow dried straight with a paddle brush until dry.

Now each section of hair has to be straightened 15 times to seal in the product and causes the reaction of the product with the hair which creates the smooth effect.
It’s at this point with the old version of the system you would have to leave the salon and keep the product on for a week before washing, this would have been a nightmare. The product leaves your hair feeling sticky and like it has a years’ worth of product build up on. Something I could not have dealt with!!

Luckily for me i was able to have my hair washed straight away with the aftercare products supplied with the treatment.  This consists of shampoo, conditioner and hair mask. These are the only products allowed to be used after the treatment as they do not contain sulphates among other things which ruin the effect of the treatment.


Finally after my wash it was time for the result, to truly test the product my hair was given a rough dry rather than its usual careful and time consuming blow dry . The results were incredible, my hair felt smooth and frizz free. It was reasonably straight but still with some natural movement, which I was pleased with as I was worried about a poker straight flat finish.

Now came a real test however as I headed out around a wet and soggy Leeds. Even this did not deter my new resilient hair. A miracle!

Two weeks later and I’m still thrilled with the results. No more time consuming styling or hiding from the weather. The hair requires much less heat styling which will aid my attempts to grow it and despite the smoothness still holds a curl just as well. One other advantage which I have noticed is that it seems to feel cleaner for longer and needs washing less. This is great as the more you wash the quicker the product wears off.

I will definitely be returning for my next Kebelo after this… the first 100 days of the rest of my hair’s life.


For more information on this system visit:

Thanks to the amazing Lee @ Renegade Hair Studio Leeds:

Monday 11 February 2013

Stuck on You..


Following on from yesterday’s lash tip I thought it might be worth sharing a great product that will also make this process much easier.

It’s time to abandon all those fiddly little tubes of glue you get with the lashes and invest in a tube of Duo Glue.


This glue is much more effective at sticking the lashes, it tends to be a thicker consistency than the glue enclosed with most lashes which can be quite runny and causes the lashes to slide around more when trying to apply.

Even better this glue is available in black! When this dries it becomes a dark black which blends in with the lashes rather than leaving a white residue which gives the false lash game away!

To apply the lashes effectively pop a blob of glue onto the back of your hand, or if you’d rather you can use something as a palette (for example the tray the lashes came in). Give the glue a couple of minutes to become tacky and then run the spine of the lash through the glue. Give the lash a minute for the glue to dry more and then place the lash on top of your own lashes.

Hopefully this will help with some of the problems a lot of people have when applying falsies…..

Duo Glue is available from most MAC stores and also from these websites:


Sunday 10 February 2013

Quick False Lash Tip!


I posted this picture on my Instagram last week and a few people have mentioned what a good tip it is that I thought it should feature on this blog…


Often when you get a pair of strip lashes the band tends to be straighter than the curve of the eyelid. This means that when you try and apply the lashes they are difficult to stick along the eyelid shape and tend to lift at the ends.

Before applying them they need to be made to curve, however sometimes trying to bend them or flexing them isn't quite enough to do this and often they straighten back up.

By twisting them round a cotton bud as shown in the picture and holding for 30 seconds or so the tightness of the way they are twisted will be enough to break the stiffness of the lash and help them to stay curvy.

If the lashes are a bit sticky from the glue that has been holding them to the packet this will usually hold them to the cotton bud. Otherwise you can just hold them with your fingers.

Hopefully if you follow this tip it will be a bit easier to then apply your false lashes….

Sunday 19 February 2012

RapidLash Eyelash Serum

This serum has been out for about 18 months now and was one of the first of its kind on the market. Since then a few other brands have brought out a similar version, some of them at a lower price point.  However this one seems to be the best and is of my “Hero Products”…

I naturally have very short eyelashes, so for years my short inadequate eyelashes have given me nothing but envy for girls with a Bambi like flutter.
Now falsies are fab but for every day I find them a bit too much effort, and if you’ve seen my earlier posts you’ll know I’m not a fan of the fibre lash mascaras.

Enter…..RapidLash Serum!!  I started using this probably about three months ago, not actually believing it was going to work because I had previously used the cheaper MAC equivalent and that did nothing for me.
 As directed I applied the product to my upper and lower lashes every night before bed.  Now when I started my lashes were also quite sparse from applying individual lashes so this product had a lot of work to do.


For a couple of weeks, nothing really happened and then after about 4-5 weeks I started noticing my lashes looking denser, darker and thicker.  From then on every week I saw an improvement, they grew longer and thicker.

About halfway through I started using the serum on my eyebrows. I was aiming to get a better growth of hair at the top of my outer brows to lift them and give them a better more defined shape. Again at first nothing but slowly now I’m seeing my brows grow where I am applying the serum.

Now a tube of Rapid Lash isn’t cheap, it’s about £40 from Boots  and I’ve just about gotten through one tube over three months. I’m pleased that it’s lasted so long and I’m sure that I would have spent almost this amount on individual false lashes. So for me the price is worth the pay off.

The proof of course is the lashes themselves so I’ve posted a picture of my lashes below. Now I wish I’d taken a before picture,  but  I never thought I’d be blogging about this as I never thought I would work. So you’ll just have to trust me that before my lashes were pretty inferior!


One last thing…I’m almost sure that as lashes naturally shed every 4-6 weeks this product will need to be continuously used to keep up my longer, thicker lashes. Will I be stocking up….definitely. 

Thursday 18 August 2011

Garnier Miracle Skin Perfector, Daily All-In-One B.B. Blemish Balm Cream

Finally the skincare sensation that is taking Asia by storm has finally reached the U.K!
B.B. or “Blemish Balm” creams are a next generation product with a hybrid formula, combining skincare with mineral pigments


5  Benefits!

B.B. Creams boast an all in one skincare solution. The product claims to moisturise, even skin tone with a luminous glow, blur imperfections and redness, smooth fine lines and contains SPF15.

Does it Work?

Ok, so hopefully none of us are naive to think we can obtain perfection from a bottle or tube…. especially for £9.99. Great skin requires more than just products…diet, sleep and hydration play a huge role.

However although the product doesn’t actually work miracles it does give pretty good results. Skin and fine lines seem smoother, skin tone is even and small blemishes are covered.

The nicest thing about this product is that it leaves the skin with a really nice glow which is key to achieving youthful looking skin. Also the product doesn’t sit on the skin and it’s pretty much undetectable that you are wearing any coverage. This is what sets it apart from a standard tinted moisturiser.

Unfortunately there are some cons to the product, it doesn’t last a full day maybe 4-5 hours at best. I use a primer under all my day make-up and this will help with the longevity of the coverage however it does somewhat defeat the objective of an all in one product.

The coverage is good, similar to a tinted moisturiser however for anyone who requires a medium coverage; this product will just not cut it alone. I have been using it in conjunction with foundation in the areas where I require more concealing.

The biggest downfall for some people will be the shades available. Light is actually what I would describe as a medium shade, and the Medium is quite dark. For anyone with fair skin the Light shade is going to leave the skin looking a bit orange

To Buy or Not to Buy?

Despite the downfalls I would still recommend buying this product if you have a medium to dark skin complexion (check the testers first!).

Even though I have to use this with a slight bit of foundation it does leave my skin looking nicer and with more of a glow than with just a foundation alone.

If you are lucky enough to only need to use a tinted moisturiser, this product is a great upgrade for you.

Finally I think the product would be great for any MEN who are brave enough to venture into the world of tinted skincare! Although it comes in girly packaging (once you hide it safely in the bathroom cupboard no one will know) it is ideal for men who want quick easy and quality daily skin care and also to look that little bit better. It’s virtually undetectable…so why not??